I'm embarking on a Paleo journey and I'm posting all of my thoughts and ideas to this blog. I'll have recipes, links, articles, and just general thoughts about the whole paleo lifestyle.
4 slices of slightly overdone bacon (for crumbling at least that's what I told myself after burning it)
When buying your bell peppers, look for peppers with large flat sides. This will keep them from rolling around and spilling out their contents. Cut the peppers in half and pull the seeds out. Try and keep the stem intact. It isn't edible, but it helps to keep the juices from the filling from spilling. You'll want to rinse them and let them dry over a towel for a few minutes.
Think of the filling as a really chunky spaghetti sauce. Start by browning the beef and sauteeing the mushrooms. Use whatever fat you want for sauteeing. I just used the bacon grease and some of the fat that rendered off of the beef.
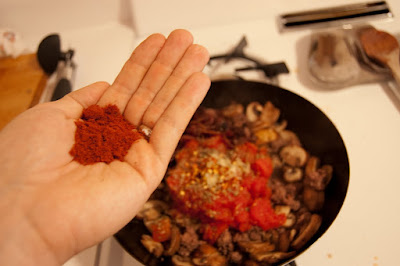
The beef should brown just about the same time that the mushrooms are done. Add the tomatoes, garlic, crumbled bacon, and spices into a large pan or wok and stir. I rarely measure in the kitchen, so here is how much of each spice I used.
Let that simmer for about 2 minutes. After that, I drained some of the liquid off to avoid making a stew. Finally, fill the peppers with the beef mixture, cover them with cheese, and throw them in the broiler for about 2-3 minutes.
Keep a close eye on the broiler. You don't want these guys to burn after all your hard work! I rotated my peppers halfway through since my broiler doesn't broil very evenly. I really enjoy the taste of a nearly raw pepper with that delicious, juicy filling inside. The crunch of the peppers is a nice addition to a pretty crunchless primal cuisine.
Hello all! With all the planning, running around, and spending money of wedding preparation, I haven't had a whole lot of time to put up any new posts.
I'll go ahead and admit that this recipe was 100% inspired by this Joyful Abode version of fried zucchini. If you don't read that site, start now. It's the best recipe site run by a lady that is 9 months pregnant. She's also fun to follow on Twitter as well. I'll admit that although I haven't tried the Joyful Abode version, I can imagine it has much more complex flavors while my version is more than likely much simpler on the tongue.
Now I can, with a clear conscience, tell you my version of her recipe. I apologize for not following my usual format. This was an impulse fry-job and this post reflects that.
You'll need almond flour, Italian seasoning, salt, pepper, granulated garlic, and zucchini.
Seeing how I didn't have coconut flower on hand to make the baked version of the recipe, I impulsively decided to bread some zucchini with almond flour, Italian seasoning, salt, pepper, and granulated garlic. I honestly thought it would end up a complete failure, but it actually worked! I'm only guessing here, but I used about 1 1/2 cups of almond flour, 2 tbs of Italian seasoning, 3 tbs of granulated garlic, a few pinches of salt, and 2-3 tbs of fresh ground pepper.
I cut a zucchini in half length wise then made cuts to form half moons. I sliced them as thinly as possible. I did this because almond flour tends to burn quickly and nobody likes burned nuts. This allows the zucchini to cook in the short amount of time you have before having to pull the veggies out of the oil.
For breading, I like to use an egg wash that is mostly egg. I'm not sure what the normal ratio is, but I used one egg and maybe 2 tbs of water. Scramble the egg and the water in a dish. Toss in your zucchini and make sure it's completely covered in egg. Now put the zucchini and all your breading into a tupperware container, and shake away. Most of the pieces should be coated pretty well. You'll have to use your hands to get a few of them coated with the leftover breading.
Finally, fry them up in the oil of your choice, but be ready to flip. I use chopsticks for frying and by the time I get 10 pieces laid out, it is time to start flipping in the same order I put them in. After flipping, I start removing them in the same order. Remember, almond flour burns really quickly!
As soon as you remove the zucchini, grate some fresh parmesan over each piece to make sure the cheese will melt and adhere to the breading. That's it!
As a caveat, I really don't advise getting into the habit of frying almond flour regularly. This is just my view on the issue, but the frying tends to oxidize a lot of fats. As a once in a while treat, it's great, but it shouldn't be a dietary staple. OK, now I have a totally clear conscience (Lutheran guilt).
Ok, guys, it's been a couple weeks, but I'm back with a new quick and easy recipe to try. It's another chop 'n' mix type of side dish. I made fajitas again tonight, but wanted something exciting to put on top.
Nopales is the name of a cactus and when you chop them up into tiny pieces, you call them by their cuter name, nopalitos. It has a slimy texture that some might find off-putting, but a quick rinse in a strainer takes care of that. Check the Mexican food aisle at your grocer and I bet you'll find nopalitos in a jar or can.
1 jar of RINSED nopalitos (2.99), 2-3 avocados (1.50), 3 tomatoes , 1 small red onion (0.25), 2 cloves of garlic(0.04), 1 jalapeño (0.05), a cup of cilantro (0.50), and the juice of 1-2 limes (0.16). That's $5.49 for enough salad to put on a few pounds of steak fajitas. Play with the proportions to your taste.
There isn't really much to tell you other than to rinse the nopalitos before you chop all of the ingredients and mix them together. It's like a chunky guacamole with pickled cactus.
It went from 30 and rainy to 90 and sunny in about 48 hours in Chicago. The drastic change finds me far from acclimated and I wanted something cool and refreshing to drink.
Quick "recipe" today:
Grab one cucumber and one lime. Dice the cucumber (removing the skin) and add it to a container with enough water to cover the cucumber. Blend the cucumber and water with the zest and juice of one lime. Strain it and you're done. Now all you have to do is dilute your concentrated juice into some water. It's a really refreshing flavor to add to tap, mineral, or soda water. You'll have to do this to your own personal taste. I decided to freeze some of my juice into ice cubes for a really hot day in the future.
Motivation - It's a word that brings up images of Matt Foley
or the ginormous Tony Robbins.
Staying motivated is hard for some people. If you're here reading this, I would like to think that you've been motivated to change the way you eat, but what do you do after a few months when the "newness" has worn off?
Nothing helps remind me of what I've accomplished quite like looking at a picture of me in my supposed "prime" and a picture of me today. The difference is undeniable and makes me want to continue improving.
Going out and being social helps to build your self esteem (unless it's really awkward like the guy all the way on the left "Do you smell that?"). People will notice the changes that you've made and most will compliment you on your accomplishments. Steer clear of the saboteurs who would love to see you fall back into your old ways.
We all have the long term goals of being healthier, more active, and looking better naked. Set some new goals that can be quickly measured. I set a goal of completing 4+ Crossfit WODs each week. It's attainable, measurable, and works into my long term goals.
Read a book relating to your current goals. I picked up The Primal Blueprint. This book is serving as a tool for am learning new perspectives on issues as well as remembering why I was so excited about going Paleo in the first place. Better yet, find a few blogs to read. There is a list to the right of this website with a few suggestions to get you started!
This kind of goes along with reading, but take some time to go over the latest research and news stories. Learn the biological reasons behind avoiding grains and eating more fat. Find out if people are supporting or disproving conventional wisdom. Most importantly, learn to question everything you read. Who supported the study? Who would make money from this study? What would Cordain think are the flaws this study? What would a vegan nutritionist think are the flaws of this study?
Seriously, go get 10 breaded buffalo wings, a burger (with the bun), fries with ketchup, jalapeño poppers, and a chocolate shake. Eat it all and remember how you feel. Not only will it cease that nagging inkling to cheat, but it will help remind you why you're not eating that way every day.
Everyone needs to be accountable to someone. Very few people can hold themselves up to high standards. Others require a method to ensure they are remaining true to their goals. I chose to blog and tweet my progress. Others may wish to incorporate a friend, spouse, or family member.
These are by no means the only way to remain motivated, these are just the methods I have used the last few months. I strongly urge you to comment on this article and share your motivational techniques with others!
I'm clearing out the fridge. Inspired by Primal Chat's recent twitter questions asking for ideas on how to save money, I'm trying to not throw any food away. Everyone always says organic produce is too expensive or that Paleo foods are too expensive (check the links to see otherwise), but if you don't eat what you buy, you're literally throwing money away. Part of saving money is simply not wasting it.
That's where fridge clearing dishes come in. What do you do when all you have left is 1/4 head of cabbage, 3 eggs, an onion, and a couple strips of bacon? You make Okonomiyaki! This is one of those it looks weird, but I promise it tastes good dishes, so trust me on this one.
You're probably sick of hearing about it, but my fiance and I discovered a ton of really cool food while traveling around Asia and some of it fits perfectly into a Paleo way of eating. Okonomiyaki is one of those dishes. It's kind of like a veggie heavy omelet, but a little more savory.
Here is what you need: 1 small yellow onion ($0.25), 1/4 head of cabbage($0.50), 5 green onions ($0.50), 4-5 strips of bacon ($1.60)and 3 eggs ($1.00). That's $3.85 for 1 XL or 2 medium sized servings
Next, take your 1/4 head of cabbage and take out the core by slicing into the cabbage at an angle. Chop it up into strips and cut 3 of the green onions into small pieces.
In a mixing bowl, beat 3 eggs and add just a little water (like 1/2 a second under a faucet). Toss the cabbage, green onions, and eggs together, trying to get at least a little egg on every piece of cabbage.
By now, the bacon should be about half done. You don't want it to be all the way cooked yet because the pan is staying on the stove for quite a while longer. Add the cabbage mix on top of the bacon and onions. Don't mix it together, just let it sit on top. The egg will drip through and make a bacon-onion crust on the bottom.
It may take almost 8-10 minutes on each side, so be patient. The egg in the center should steam while the bottom crust is forming. When you're finished, garnish it with some green onions. I had some olive oil mayo and spicy Thai sauce (no sugar!) that I mixed together to make a tangy sauce for dipping. Traditional okonomiyaki is topped with bonito flakes. Bonito flakes are smoked fish shavings that smell like a barn and are really delicious. The coolest thing is that when they are over steam, the shavings move like they're alive. It's a really cool ingredient worth checking out if you have time and access to an Asian market. Ok, enough geeking out on food. Check out the video under this picture to see our last okonomiyaki in South Korea!
We're all trying to save money while eating paleo. Part of making your money stretch is making the most of the food you buy. My last meal was all about a delicious sauce and the good thing about sauces is that you can make a bunch of it on the cheap and most of the time, freeze it for the future. The problem is that if you freeze a bowl of sauce, you have to thaw the whole bowl and refreeze it each time you want some sauce. That's why I use my ice cube trays to help portion out the sauce. Try it out. You'll appreciate the saved time and money!
OK, so the pictures look a little ugly, but this sauce thaws just fine and should keep for a few months, meaning I don't have to dye the kitchen counters green again any time soon!