rss
email
twitter
facebook
Showing posts with label red pepper flakes. Show all posts

Tuesday, June 29, 2010

Italian Stuffed Peppers

Share this on Facebook
From Stuffed Peppers

Looks good, right? Here's what you need:

From Stuffed Peppers
  • 3 Bell Peppers cut in half
  • 1 lb of grass fed beef
  • 6 cloves of minced garlic
  • 1 can of diced tomatoes
  • 8 oz of baby bella mushrooms
  • paprika
  • Italian seasoning
  • Red pepper flakes
  • Mozzarella cheese
  • 4 slices of slightly overdone bacon (for crumbling at least that's what I told myself after burning it)
When buying your bell peppers, look for peppers with large flat sides. This will keep them from rolling around and spilling out their contents. Cut the peppers in half and pull the seeds out. Try and keep the stem intact. It isn't edible, but it helps to keep the juices from the filling from spilling. You'll want to rinse them and let them dry over a towel for a few minutes.

Think of the filling as a really chunky spaghetti sauce. Start by browning the beef and sauteeing the mushrooms. Use whatever fat you want for sauteeing. I just used the bacon grease and some of the fat that rendered off of the beef.

From Stuffed Peppers

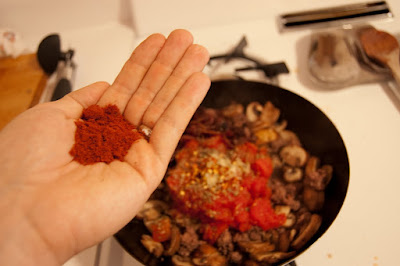
The beef should brown just about the same time that the mushrooms are done. Add the tomatoes, garlic, crumbled bacon, and spices into a large pan or wok and stir. I rarely measure in the kitchen, so here is how much of each spice I used.

From Stuffed Peppers


From Stuffed Peppers


From Stuffed Peppers

Let that simmer for about 2 minutes. After that, I drained some of the liquid off to avoid making a stew. Finally, fill the peppers with the beef mixture, cover them with cheese, and throw them in the broiler for about 2-3 minutes.

From Stuffed Peppers


From Stuffed Peppers

Keep a close eye on the broiler. You don't want these guys to burn after all your hard work! I rotated my peppers halfway through since my broiler doesn't broil very evenly. I really enjoy the taste of a nearly raw pepper with that delicious, juicy filling inside. The crunch of the peppers is a nice addition to a pretty crunchless primal cuisine.


Share this on Facebook

Friday, April 23, 2010

Feta and Beef Stuffed Mushrooms with Tapenade

These guys may not look the best, but you're going to love the way they taste!

From Feta Cheese Beef Mushrooms with Tapenade

I've been excited about making this all week. Stick with me with the pictures, I didn't get everything photographed because I usually start off with a general idea about how to make a dish then make stuff up as I go.

Here is what I used:

From Feta Cheese Beef Mushrooms with Tapenade
Starting at the pepper grinder going clockwise: Pepper, 2 lbs of button mushrooms(4.00), olive oil (0.25), green olives (0.85), capers (0.10), anchovy paste (optional) (0.05), black olives (1.39), parsley (0.10), 5 garlic cloves (0.10), 85/15 grassfed beef (5.99), 1/4 lb of feta cheese (1.08), *not pictured 1/8 of a yellow onion (0.30), and red pepper flakes (0.02). That's a total of 14.23 for 4 servings @ $3.56 each.

Before starting, go ahead and get your oven preheated to 375. Start by removing the stems from the mushrooms. They should come out easily. Be careful to not break the mushroom caps as you'll want them to catch all the tasty beef juices later.


From Feta Cheese Beef Mushrooms with Tapenade
Put a little olive oil in your hand and dip each mushroom cap in your hand. This step may not be necessary, but it's something I decided to do. Like I said, I make this stuff up as I go. Next, lay out all your mushrooms on a cooking sheet with some parchment paper or foil underneath.

From Feta Cheese Beef Mushrooms with Tapenade

From Feta Cheese Beef Mushrooms with Tapenade

I ended up with 20 good mushroom caps, so I chopped up my feta into 20 small cubes and stuffed them inside the shrooms.


From Feta Cheese Beef Mushrooms with Tapenade

After that, I mixed my beef with 4 grated garlic cloves, 1/8 (1 slice) of an onion, a few shakes of red pepper flakes, and black pepper. Make sure you slice the onion up as fine as you can. If the chunks are too large, it will make the beef watery and it will fall apart. We want it to stay in one big clump on top of the mushrooms.
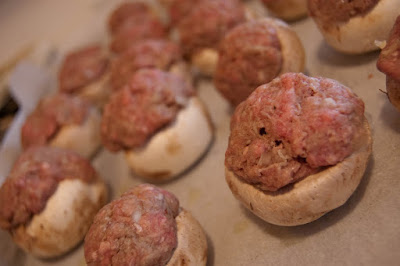
Portion out the meat and cover each mushroom. 1 lb of beef portioned into balls a little smaller than golf balls worked pretty well for me. When they're all covered, you can put them in the oven at 375 for about half an hour. Remember, your oven is different from mine, so check after 25 minutes and see if they look finished and adjust your time from there.


From Feta Cheese Beef Mushrooms with Tapenade

Now, for the tapenade. Tapenade is a kind of like an olive and caper relish. It's super easy to make. It's a chop 'n' mix topping. Mix 4 oz of drained black olives (I got mine prechopped), 4 oz of drained and chopped green olives (I used the black olive can to measure 4 oz), a small bunch of parsley, 20 capers, and a clove of grated garlic. You may want to add a little olive oil to help keep everything moist. I used about a tablespoon. If you want, you can add a couple drops of anchovy paste or an anchovy fillet. I know a lot of people hate anchovies, so I kept it optional. Also, if you have basil, you can add basil to tapenade as well. It depends on what herbs you like.

From Feta Cheese Beef Mushrooms with Tapenade

When the mushrooms are finished, they should be releasing some delicious beef juices onto the feta, softening the cheese up. Plate the mushrooms up with some tapenade and eat up!

From Feta Cheese Beef Mushrooms with Tapenade


Share this on Facebook

Tuesday, April 13, 2010

Collard Greens and Ham Hocks

From Collards with Ham Hocks

I mentioned in my Cajun Salmon post that I whipped up some collards and wasn't happy with them. Within a couple of days, I saw at least 3 different people on Twitter asking how to prepare collard greens. Well, I finally made it to the store to pick up the secret ingredient that makes collards so delicious: ham hocks. Ham hocks are kind of like the ankle of a pig. There isn't a whole lot of meat on them, but they have a lot of flavor when boiled to make a stock. Collards are typically made with smoked ham hocks, but my grocer only had regular hocks. I used liquid smoke to compensate.

From Collards with Ham Hocks
OK, here is what you need: 2 ham hocks (1.63), liquid smoke (0.07), 3 bags of frozen collard greens (1.29 x 3), red pepper flakes (0.05), black pepper, and salt. That's a total of $5.62 and you should get at least 6 servings. That's $0.94 per serving.

This is an easy recipe, but it takes a little time, probably about 2 1/2 hours from start to finish. Start off by frying the ham hocks in a little leftover bacon grease or olive oil on all sides.

From Collards with Ham Hocks

Keep rolling the hocks around so they'll brown on each side. These guys will spit a lot of grease at you, so when you're not flipping, keep them covered. Your forearms will thank me.

From Collards with Ham Hocks
As the hocks finish up, start boiling a big pot of water. Add two tablespoons of liquid smoke to the water as it heats up.

**Liquid smoke contains sugar and soy, but 2 tbs don't even register as a gram of either ingredient.

From Collards with Ham Hocks

Once the water boils, add the ham hocks. Let them boil for about an hour and a half until the skin starts to fall off when you poke at it. By this time, there should be about an inch of water in the pot. If the water level is too high, wait for it to boil down. Don't remove any water. You want the flavors to condense. When the water level is low enough, add all of the collard greens, a tsp of red pepper flakes, and mix it together. Let them boil for a couple minutes and that's it! Some people like to eat their collards with hot sauce. The ham hocks don't really have much meat on them, so do what you wish with them. They're not pretty, but they taste pretty good.

From Collards with Ham Hocks
A quick note - when the collards cool, they may congeal due to the gelatin that is released from the hocks. Don't be alarmed by this, it's perfectly normal.