I'm embarking on a Paleo journey and I'm posting all of my thoughts and ideas to this blog. I'll have recipes, links, articles, and just general thoughts about the whole paleo lifestyle.
4 slices of slightly overdone bacon (for crumbling at least that's what I told myself after burning it)
When buying your bell peppers, look for peppers with large flat sides. This will keep them from rolling around and spilling out their contents. Cut the peppers in half and pull the seeds out. Try and keep the stem intact. It isn't edible, but it helps to keep the juices from the filling from spilling. You'll want to rinse them and let them dry over a towel for a few minutes.
Think of the filling as a really chunky spaghetti sauce. Start by browning the beef and sauteeing the mushrooms. Use whatever fat you want for sauteeing. I just used the bacon grease and some of the fat that rendered off of the beef.
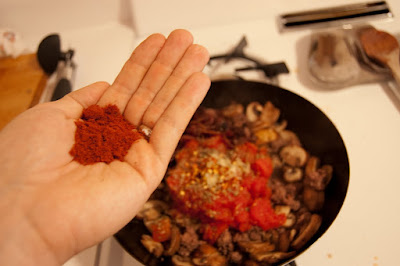
The beef should brown just about the same time that the mushrooms are done. Add the tomatoes, garlic, crumbled bacon, and spices into a large pan or wok and stir. I rarely measure in the kitchen, so here is how much of each spice I used.
Let that simmer for about 2 minutes. After that, I drained some of the liquid off to avoid making a stew. Finally, fill the peppers with the beef mixture, cover them with cheese, and throw them in the broiler for about 2-3 minutes.
Keep a close eye on the broiler. You don't want these guys to burn after all your hard work! I rotated my peppers halfway through since my broiler doesn't broil very evenly. I really enjoy the taste of a nearly raw pepper with that delicious, juicy filling inside. The crunch of the peppers is a nice addition to a pretty crunchless primal cuisine.
I've been excited about making this all week. Stick with me with the pictures, I didn't get everything photographed because I usually start off with a general idea about how to make a dish then make stuff up as I go.
Starting at the pepper grinder going clockwise: Pepper, 2 lbs of button mushrooms(4.00), olive oil (0.25), green olives (0.85), capers (0.10), anchovy paste (optional) (0.05), black olives (1.39), parsley (0.10), 5 garlic cloves (0.10), 85/15 grassfed beef (5.99), 1/4 lb of feta cheese (1.08), *not pictured 1/8 of a yellow onion (0.30), and red pepper flakes (0.02). That's a total of 14.23 for 4 servings @ $3.56 each.
Before starting, go ahead and get your oven preheated to 375. Start by removing the stems from the mushrooms. They should come out easily. Be careful to not break the mushroom caps as you'll want them to catch all the tasty beef juices later.
Put a little olive oil in your hand and dip each mushroom cap in your hand. This step may not be necessary, but it's something I decided to do. Like I said, I make this stuff up as I go. Next, lay out all your mushrooms on a cooking sheet with some parchment paper or foil underneath.
After that, I mixed my beef with 4 grated garlic cloves, 1/8 (1 slice) of an onion, a few shakes of red pepper flakes, and black pepper. Make sure you slice the onion up as fine as you can. If the chunks are too large, it will make the beef watery and it will fall apart. We want it to stay in one big clump on top of the mushrooms.
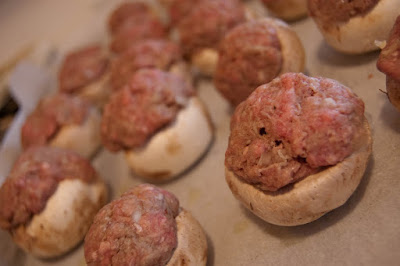
Portion out the meat and cover each mushroom. 1 lb of beef portioned into balls a little smaller than golf balls worked pretty well for me. When they're all covered, you can put them in the oven at 375 for about half an hour. Remember, your oven is different from mine, so check after 25 minutes and see if they look finished and adjust your time from there.
Now, for the tapenade. Tapenade is a kind of like an olive and caper relish. It's super easy to make. It's a chop 'n' mix topping. Mix 4 oz of drained black olives (I got mine prechopped), 4 oz of drained and chopped green olives (I used the black olive can to measure 4 oz), a small bunch of parsley, 20 capers, and a clove of grated garlic. You may want to add a little olive oil to help keep everything moist. I used about a tablespoon. If you want, you can add a couple drops of anchovy paste or an anchovy fillet. I know a lot of people hate anchovies, so I kept it optional. Also, if you have basil, you can add basil to tapenade as well. It depends on what herbs you like.
When the mushrooms are finished, they should be releasing some delicious beef juices onto the feta, softening the cheese up. Plate the mushrooms up with some tapenade and eat up!
Let me start off this post by divulging that I was an accounting major for four years before making the switch to sports medicine. Organization of numbers and data is kind of in my blood, so the prospect of figuring out precise costs of meals excites me. Maybe I should change the name of the blog to Paleonerd.
Yesterday, I put up a post talking about the true cost of going paleo. After a storm washed out some baseball games I was working at, I got a chance to go grocery shopping a day early. This is probably the most excited I've been to go grocery shopping EVER. I was so excited to start putting real dollar amounts on the meals I'm making.
I do a vast majority of my shopping at Caputo's. I believe that it's a Chicagoland only grocer, but any checking around on Yelp will tell you all about the unbelievable produce they get and more importantly, the low prices they charge. The butcher at Caputo's is great as well, but you have to take advantage of specials and surplus sales. For the most part, you'll have to get most of your meat at farmer's markets, private suppliers, or online. I'll pick up meat at Trader Joe's or Whole Foods on occasion as well, but to be honest, ALWAYS getting grass fed meat can be tough. Sometimes you'll just have to offset poorer quality meat with some extra veggies and omega 3 in your diet. Always take advantage of sales on grass fed beef and freeze it for use later.
Get an idea of what you want to make for the week and by all means, make a list and stick to it! I usually prepare 3 specific meals a week and fill in all of my other meals with leftovers, eggs, and salmon steaks.
With money on my mind, I looked in the fridge before leaving and noticed that we had a tomato and a couple onions about to go bad. As opposed to throwing food and money away, I would much rather make something and at least squeeze out a couple meals (sorry if that phrase sounds gross). Onions and tomato make the base of a good chili and since I already have some ground beef and canned tomatoes on hand, I decide to add some peppers, mushrooms, and seasoning to the list to help salvage my produce.
2 hours and $76.94 later, I'm back home and ravenous for some chili. I'm not going to pretend that I'm the first person to come up with the idea of paleo chili. In fact, I bet the first paleo cookbook started with a steak recipe on page 1 and a chili recipe on page 2. Let's get into the real cost of a pot of paleo chili.
Starting at 12 o'clock going clockwise: 2 cans of sliced tomatoes (1.09 each), 1/2 package of button mushrooms (1.15),1 pound of ground beef (5.99), 2 jalapenos (0.17), chili seasoning (1.29), 4 cloves of garlic (0.10), 1/2 a yellow onion (0.30), 1/2 a red onion (0.30), and a roma tomato (0.40)
OK, that's a total of $11.88. Over half of that cost is the meat, so you can see how much taking advantage of savings on quality meat can save you. The next question is "How many meals can I get for that $11.88?" You'll have to wait until after I give you my super quick synopsis of how to make chili. As most of you reading this have made chili before and I'd hate to insult your intelligence, feel free to skip to the end for the per meal total.
To make chili:
Begin by browning the ground beef in a pan. When you can see a little grease coming off the meat, add chopped onions.
That lady isn't joking about washing your hands after handling a jalapeno. They say you should hum happy birthday to yourself while washing your hands to get rid of the capsaicin (a powerful anti-inflammatory), but I say you should hum Freebird just to be safe. Let the meat, onions, and peppers cook while you quarter the mushrooms. This time allows the water to escape the veggies, helping to make a flavorful base for the chili.
Once that starts to boil, turn the heat down as low as you can and let that go for about 10 minutes. Stir it a couple of times so that nothing sticks to the bottom. Feel free to eat it whenever your patience is up!
BAM! Labna is a dairy product with 1/2 a gram of sugar per tablespoon. I find that one tablespoon takes chili to the next level. This is one of those small compromises I make to keep myself happy. Give it a shot, I think you'll like it.
After eating a bowl, I measured out 3 more full bowls of chili from the pot. That makes 4 total bowls (those accounting skills really come in handy) at $2.97 per meal. I'll admit that chili is just cheap by nature, but still, $3 isn't too bad for a meal.
Part of what I hope to do with this blog is give some real life applications of things that I've learned during my own personal primal journey. If you want to keep yourself motivated and excited about your next meal, I suggest you take advantage of leftovers.
If you made last night's recipe of Gorgonzola Burgers and Mashed Cauliflower, then you may have some leftovers. The best part about leftovers is that a lot of your prep for a new meal is already done. Here's what you need to get ready:
Clockwise from 9 o'clock: Sauteed portabella mushrooms (cooked in beef fat from the previous post), Olive oil *I called an audible and switched it up to coconut oil while cooking - I liked the flavor, but my fiance hated it, pepper, salt, green onions, eggs, and leftover mashed cauliflower
Roughly chop up the mushrooms. I like big chunks because they help give the omelette some much needed texture.
Beat the eggs and start those in a greased pan on low heat. Preheat your broiler at this time, you'll need it in a few minutes. Patience is the key with good eggs. You have to cook them over low heat to keep them from burning. This also keeps the fats and proteins from oxidizing - some science stuff for a later post. My fiance cooked the eggs and she has her own method, using a spatula to stir the eggs as they cook. I have my own method that I'll cover in the future.
Once the eggs are about 80% cooked and there is only a little liquid at the top, add the mushrooms, chives, and any other veggies you want to add. Finish the omelette off in your broiler
Finish the eggs off in your broiler until they are cooked through. I don't have any problems with runny or raw eggs, but I know most people don't care for them that way.
For the cauliflower pancakes, add one egg yolk to about a cup or so of the cauliflower mash from last night. Mix that up well as the yolk is what will hold the pancake together. If it feels too loose, add another yolk, but don't get too crazy. Mix that well and throw it into a skillet with some coconut oil or the oil of your choice. Be careful when flipping so that you don't let the delicate pancake fall apart. I like to use a ridiculously oversized spatula.
Alright, that's it. Plate it up and eat. I'll be honest, it's not the most exciting recipe, but sometimes it's nice to have some direction or new ideas. The pancakes will be brittle, but they're an interesting breakfast side to try.
Disclaimer: I am not a food blogger. I understand that the small amounts of butter, cream, and cheese skirt around the edges of hardcore paleoism, but I have found a happy balance for myself and you'll have to search your caveman soul long and hard to decide if small amounts of dairy are right for you.
Ok, with that out of the way, let's get started. To keep you interested, here is the final product:
Starting at 6:00 - 2 Portabella caps, button mushrooms, 1 lb of ground beef, pepper, cauliflower, a yellow onion, butter, cream, gorgonzola, salt, and about 8 cloves of garlic.
Chop up the cauliflower and start boiling it. You'll need it to be tender to mash it and that can take a little while, so I like to start it right off the bat. Here is how roughly I chopped it up:
Next, I used a microplane to get the garlic into a paste. I filed down 8 cloves of garlic, seperating half of it for the burgers and half of it for the cauliflower. I love garlic, so feel free to cut that down by as much as half if you're not such a fan of the stuff. Quick note - this microplane is awesome for quickly prepping garlic and also making lemon or lime zest for Mexican dishes.
Next, roughly chop the onions. Roughly chopping them will help give some texture to the burgers. Ultimately, it's up to you how many onions you put in the burgers. I used half an onion for a pound of meat.
Mash the onions and half of your garlic into the meat. I prepare the meat on parchment paper for 2 reasons. For one, it helps with contamination (although I rarely worry with beef) and it also helps keep the burgers in nice thin patties while transferring them to the grill. After mashing the meat together with the garlic and onion, portion it out into a few equally sized balls then mash them down into imperfect little discs. After that, you can transfer them directly onto your grill by flipping the parchment paper over.
At this point, you should be able to poke a fork into the cauliflower and it should come right back out. If it sticks in the cauliflower, wait a couple more minutes and try again. Once it's tender enough for the fork to come out, strain the water and toss a small cube of butter into the pan to start melting. Looks like I left some paper on the butter. Oops. Begin mashing the cauliflower into the butter. Once you've gotten the cauliflower broken down quite a bit add about a tablespoon of cream. Continue mashing adding a small amount of cream to the mix until you get the texture you like, but be careful. Boiled cauliflower holds a lot of moisture and if you add too much cream, you'll just get soup. Next, add the garlic, some salt, a few grinds of pepper to your personal taste and mix. Let that sit for a few so the garlic has some time to mellow out a little bit.
At this point, the burgers should be ready to flip. After you flip them, press them down, but only a little bit. We'll need the fat to sautee the mushrooms. Add the button mushrooms to the greasy areas of your grill. Add your portabellas at this time as well, but you may need to rub them in the oil of your choice to keep them from burning. If you have a nice pool of beef fat somewhere on the grill, feel free to use that. I know I would.
OK, we're almost done. Pull the burgers and mushrooms off as they're ready and put the gorgonzola cheese crumbles on ASAP. I like my gorgonzola to melt a little before serving the burgers.