I'm embarking on a Paleo journey and I'm posting all of my thoughts and ideas to this blog. I'll have recipes, links, articles, and just general thoughts about the whole paleo lifestyle.
4 slices of slightly overdone bacon (for crumbling at least that's what I told myself after burning it)
When buying your bell peppers, look for peppers with large flat sides. This will keep them from rolling around and spilling out their contents. Cut the peppers in half and pull the seeds out. Try and keep the stem intact. It isn't edible, but it helps to keep the juices from the filling from spilling. You'll want to rinse them and let them dry over a towel for a few minutes.
Think of the filling as a really chunky spaghetti sauce. Start by browning the beef and sauteeing the mushrooms. Use whatever fat you want for sauteeing. I just used the bacon grease and some of the fat that rendered off of the beef.
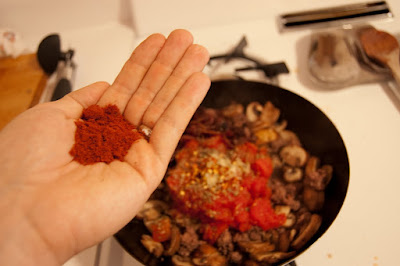
The beef should brown just about the same time that the mushrooms are done. Add the tomatoes, garlic, crumbled bacon, and spices into a large pan or wok and stir. I rarely measure in the kitchen, so here is how much of each spice I used.
Let that simmer for about 2 minutes. After that, I drained some of the liquid off to avoid making a stew. Finally, fill the peppers with the beef mixture, cover them with cheese, and throw them in the broiler for about 2-3 minutes.
Keep a close eye on the broiler. You don't want these guys to burn after all your hard work! I rotated my peppers halfway through since my broiler doesn't broil very evenly. I really enjoy the taste of a nearly raw pepper with that delicious, juicy filling inside. The crunch of the peppers is a nice addition to a pretty crunchless primal cuisine.
I'm clearing out the fridge. Inspired by Primal Chat's recent twitter questions asking for ideas on how to save money, I'm trying to not throw any food away. Everyone always says organic produce is too expensive or that Paleo foods are too expensive (check the links to see otherwise), but if you don't eat what you buy, you're literally throwing money away. Part of saving money is simply not wasting it.
That's where fridge clearing dishes come in. What do you do when all you have left is 1/4 head of cabbage, 3 eggs, an onion, and a couple strips of bacon? You make Okonomiyaki! This is one of those it looks weird, but I promise it tastes good dishes, so trust me on this one.
You're probably sick of hearing about it, but my fiance and I discovered a ton of really cool food while traveling around Asia and some of it fits perfectly into a Paleo way of eating. Okonomiyaki is one of those dishes. It's kind of like a veggie heavy omelet, but a little more savory.
Here is what you need: 1 small yellow onion ($0.25), 1/4 head of cabbage($0.50), 5 green onions ($0.50), 4-5 strips of bacon ($1.60)and 3 eggs ($1.00). That's $3.85 for 1 XL or 2 medium sized servings
Next, take your 1/4 head of cabbage and take out the core by slicing into the cabbage at an angle. Chop it up into strips and cut 3 of the green onions into small pieces.
In a mixing bowl, beat 3 eggs and add just a little water (like 1/2 a second under a faucet). Toss the cabbage, green onions, and eggs together, trying to get at least a little egg on every piece of cabbage.
By now, the bacon should be about half done. You don't want it to be all the way cooked yet because the pan is staying on the stove for quite a while longer. Add the cabbage mix on top of the bacon and onions. Don't mix it together, just let it sit on top. The egg will drip through and make a bacon-onion crust on the bottom.
It may take almost 8-10 minutes on each side, so be patient. The egg in the center should steam while the bottom crust is forming. When you're finished, garnish it with some green onions. I had some olive oil mayo and spicy Thai sauce (no sugar!) that I mixed together to make a tangy sauce for dipping. Traditional okonomiyaki is topped with bonito flakes. Bonito flakes are smoked fish shavings that smell like a barn and are really delicious. The coolest thing is that when they are over steam, the shavings move like they're alive. It's a really cool ingredient worth checking out if you have time and access to an Asian market. Ok, enough geeking out on food. Check out the video under this picture to see our last okonomiyaki in South Korea!
I'm trying my first French meal today. Today's meal is a little more time consuming, making it perfect for a Sunday night dinner. You'll have to set aside a couple of hours if you want to make this taste right, but only about 30 minutes are actually spent cooking. The rest of the time is just waiting.
Starting at the big yellow squash and going clockwise: spaghetti squash (2.04), salt, ground pepper, Red Wine (I used Trader Joe's 2 buck Chuck @ $2.99), Worcestershire sauce (0.05), Thyme (0.05), Parsnip (0.49), carrot (0.10), yellow onion (0.80), beef bouillon cube (0.10), 2 lbs of boneless pot roast (6.70), 5 strips of bacon (1.85), and 4 cloves of garlic (0.08) - The total cost of this meal is 15.25 and you can get 4 servings for a total of 3.81 per serving.
Disclaimer: Worcestershire sauce is not paleo. It contains soy and HFCS. 2 tbs are used in the marinade, but I cannot find a way to get that flavor without using the sauce. 2 tbs contain 2 grams of sugar, which I think is fairly minimal. Wheat free soy sauce may come close, but I have not tried it yet. The carrots and parsnips are another point of contention among paleos. I find the occasional carrot to be ok despite its sugar content.
Begin by making the marinade: 3/4 of a cup of wine, a pinch of salt, 2 tbs of Worcestershire sauce, and some ground pepper. Cut the meat into 2 inch cubes and mix it into the marinade. Cover it and leave it for at least 30 minutes, but an hour or more is better.
Begin frying up your bacon! Bacon excites me. Cut the bacon into smaller pieces before frying it. It will be used as a topping when the dish is complete.
Lay your marinated meat on a paper towel and lightly pat it down. You need to remove the excess moisture so that the bacon grease doesn't explode all over your arm. Now take your meat and place it in the pan. I use the center portion of the pan so I can get a really quick sear and lock in the flavors of the marinade. Get a good sear on at least 2 sides.
Eventually it will look like the picture above. It will take a few minutes, though, so while you're waiting, get the spaghetti squash ready by cutting it in half length ways and preheating the oven to 375.
Once they're clean, rub on some olive oil over the entire surface. Add salt and pepper to your taste, but you probably won't need much salt. The dish you're serving this with will be fairly salty on its own.
Cover the pan with foil. The meat is still a little tough, so letting it simmer for a while will help tenderize the meat. If you have the means to buy ribeye, you don't need to worry about the texture of the meat as much. I've been trying to keep paleo affordable, so I went with the cheaper cut of meat and the free ingredients time and patience.
Wait for about an hour. The spaghetti squash and beef will take about this much time until they're ready. We watched a couple episodes of Curb Your Enthusiasm and had some seltzer water with lime.
Remove the foil from the beef. At this point, you just need to check the beef for tenderness and the sauce for your preference of thickness. I was still stuffed from lunch, so I decided to wait so I could get the sauce to a near gravy-like thickness
Serve it on top of the spaghetti squash so the squash can soak up the tasty juices. Sprinkle some of the bacon around, and here is what you'll end up with! (I cheated and dusted 1 tsp of parmesan on mine)
Do you ever wonder why when you get bacon in restaurants, it looks like this...
...and your bacon at home looks more shriveled than George Costanza getting out of the pool?
While some restaurants put a heavy piece of metal on their bacon to keep it straight, others use a tool that you have at home: the oven.
1)Preheat your oven to 400 degrees while laying bacon out on a cooking sheet with parchment paper. I use parchment paper so I don't have to clean up the sheet - yes I'm that lazy.
2)Add as much pepper as you can handle to the bacon